Category Archives: Tutorials

Ombre Vase Fillers

A few years ago I put together these ombre vase fillers for a quick spring project. With spring coming soon I thought it would be a good time to re-post this project that was originally a part of my Girls Want Pearls series. It was a lot of fun choosing the colors to use and creating a custom look using my own shading.

Are you as ready for spring as I am? I’m done with winter and to prove it I’ve got a fresh new pearl project to welcome in warmer weather when it finally gets here. Welcome to Girls Want Pearls #29!
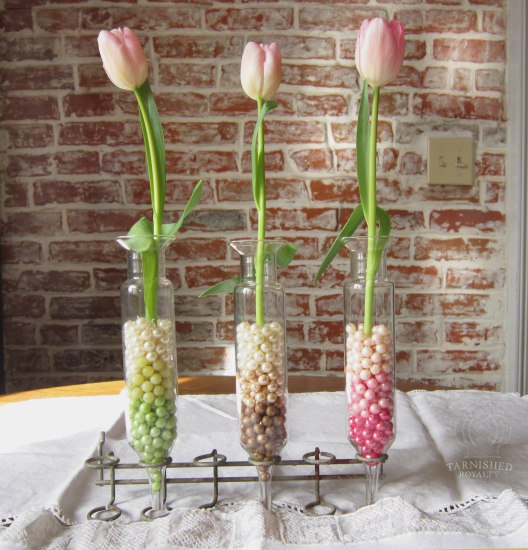
I want to show you a super easy project with high visual impact.

You’ll need:
3 straight skinny clear vases (you can find them at most dollar stores), pearls and beads in various colors, water, and 3 flower stems.
flowervases1b
I love ombre shading! I knew I wanted to create an ombre effect with dark to light colored pearls / beads. I went to shop for the perfect combination of colors but wasn’t quite coming up with what I needed. What do you do when you can’t find what you’re looking for? You make it!
flowervases2b
I did some paint mixing with my craft paints to create 4 of the colors in my design: the cocoa brown, the bright green, and the two lighter shades of pink. I would have much prefered to buy what I needed, and I’m sure you can find the exact right colors online, but in case you can’t, or you like to dabble in paint mixing, here’s the solution I came up with. I placed a dollup of the mixed color in a small plastic container with a lid (butter tub, coffee can, etc.). I dropped in the desired amount of white pearls, put the lid on and shook them up. Then I poured them out on waxed paper and let them dry, jiggling them periodically to keep them from sticking. If you want a more translucent color, add a little water to the paint.

flowervases4

Once the pearls are dry, place them in the vase, add water and flowers. BTW, I did get lucky when it came to my flower purchase. I knew I wanted light pink tulips for this project. Any color would be lovely but that’s what I pictured. I went to Walmart and they had them! Exactly what I needed at the first place I looked! Bam!
flowervases3b
So there you have it, an inexpensive way to bring a good dose of spring to your home using pearls.

Share Button

DIY Pearl Daisies

Here’s a quick DIY project that you can do to bring flowers into your décor while you wait for spring to bring the real deal. I originally posted this DIY Pearl Daisies project as part of my 52 week series,
Girls Want Pearls.

For today’s project I raided my button stash and grabbed some pearls, wire, and twigs from the yard to create…

daisy1a
daisy1

To create the daisy I simply threaded the wire through the back of the button and, using one long continuous strand of wire, threaded pearls on and looped each petal, twisting together in the back before creating the next loop. Then I attached the flower to the twig with wire.

daisyback

You can glue on lace or burlap leaves to complete the look.

daisy2

I like the juxtaposition of the rustic twig with the fancy pearls. I placed mine in a “vase” of corroded copper pipe to give it even more of a rustic feel. The look can be easily changed up by using buttons in various styles and colors. Have fun with it!

I’m really ready for winter to be over.
I miss my bicycle.
And green grass.
And fresh air.

Only 39 days until spring!

Share Button

DIY Heart Garland

My favorite kind of crafty project are the ones that are quick and easy and inexpensive. And if I have most or all the supplies on hand already, even better. Whether you already have the supplies for this project or not, there are very few things needed. With Valentine’s Day coming up (and being a lover of seasonal decorating) I went to work thinking up a simple project to celebrate the holiday. This DIY heart garland is what I came up with.

diy_heart_garland_valentinesday

Actually I came up with two different DIY heart garlands. It’s difficult to see the second, smaller one in this picture so I will show it again later in the post.

diy_heart_garland_3_valentinesday

Along with wanting it to be simple, I wanted it to have an organic feel. So I dug around in my craft supplies, found a bunch of leather strips and knew they would be the perfect material to use.

diy_heart_garland_4_valentinesday

diy_heart_garland_2_valentinesday

And like any good hoarder crafter, I also had a bunch of neutral fabric scraps and lace that would complement the leather and soften the design.

diy_heart_garland_small1

For the smaller garland I cut heart shapes out of an old leather belt. It was a little bit more work than the first one but I like the way it turned out.

diy_heart_garland_small2

The belt I used had grommets which added a nice texture and also gave me a good place to string the skinny piece of leather for the garland.

You could easily change up the design with whatever colors you like. It’s a fun project to complete in an afternoon.

All you need to make your very own DIY heart garland is leather strips that can be found at your craft store, fabric and lace scraps, and for the smaller garland you’ll need a leather belt or leather scraps that can also be found at craft stores. You’ll also need glue (I used Loctite), scissors and a pair of pliers.

…….diy_heart_garland_supplies_leather_strips diy_heart_garland_supplies_fabric_lace

Now to create. The process for the larger garland:

STEP 1: For each heart, cut two strips of leather, 7 3/8″ in length for the outer strip and 6 1/2″ in length for the inner strip. The width of my leather ranged from 1/8-3/8″.

……………….diy_heart_garland_step_leather diy_heart_garland_step_strips

STEP 2:Cut strips of fabric (and leather lace if desired) to desired length for the “tails”. They will be doubled over so you will want them to be twice the length to allow for that. My cut strips ranged in length from 12-20″ and in width from 1/8-1/2″. I used 2-3 per heart.

diy_heart_garland_step_leather_pinch

STEP 3: Find the center of each piece of leather and using your pliers pinch it to form the bottom point of the heart.

………………diy_heart_garland_step_glue_heart_1 diy_heart_garland_step_glue_heart_2 diy_heart_garland_step_glue_heart_3

STEP 4: Fold over one end of the heart and glue a little further than halfway down on the other side.

STEP 5: Allow to dry then overlap and fold over the other piece, gluing in place as shown in center picture above.

STEP 6: Once that has dried glue one end of the second (outer) strip to the first heart at the top, center.

STEP 7: Allow to dry then glue the other end in the same manner.

……………………………………….diy_heart_garland_step_slipnot2 diy_heart_garland_step_slipnot

STEP 8: Take the strips of fabric and/or leather lacing and attach each to the bottom of the heart with a slipknot.

STEP 9: For the final step, thread them onto the length of leather to complete the garland. I used 1/8 inch deerskin lace leather for the garland length, cut to approx. 5 ft. and I used the extra for some of the hearts’ “tails”.

diy_heart_garland_5_valentinesday

To make the smaller garland:

diy_heart_garland_supplies_belt

STEP 1: Draw or print a heart shape in desired size (mine is approx. 1 1/2″ x 1 1/2″). Using the paper heart as a template, draw around it onto the leather to make five hearts.

STEP 2: Cut them out using heavy duty scissors or a razor knife. Don’t worry if the edges are ragged and uneven, the lace will cover that up.

diy_heart_garland_step_small_lace

STEP 3: Decorate each heart with lace, covering entire heart or using it as a trim around the edges. Glue lace in place and trim.

STEP 4: Cut a leather lace or strip 2-3 feet long. This will be your garland base.

STEP 5: Unless you happen to have grommets in your leather hearts, you will want to attach them by punching a hole at the top of each heart. You can use a nail and hammer to do this or a leather punch. After punching a hole in each heart, attach them to the leather garland base, tying them on with small fabric strips.

diy_heart_garland_small3

Love is in the air!

As always, feel free to ask questions and please let me know if you need clarification on my instructions. :)

Be sure to check back in a few days for more Valentine-themed fun.

Share Button

Rustic Twiggy Tablescape

With Thanksgiving upon us I would like to share a unique way to incorporate natural elements into your tablescape. There’s something romantic about bringing nature indoors. And the fact that it
costs next to nothing is a bonus.

I shared these pearly twiggy napkin rings a few years ago during my Girls Want Pearls series.

napkinring2

napkinring1

Very little is needed to make these:

napkinring8

Just gather some twigs and be sure to find some that are super skinny for threading pearls onto. If you can’t find any skinny enough, you can cheat and use brown wire for the ones that have pearls. Make five bundles of twigs and wrap with wire. Tie your twine around each bundle, spacing them approx. 1/2 inch apart. I found it easier to prepare the knots in advance and then slide the bundles in. Form the finished twine around a napkin and tie the ends together. Thread your pearls on and add a dot of glue if needed.

napkinring8

napkinring7

For your Christmas table you could mix in some sparkly beads in your color choice.

napkin-ring-beads2

pussy_willow_twigs_1

Add a natural-elements centerpiece, maybe vases full of twigs or a tray of hedge apples, pumpkins or artichokes for a cohesive look.

pussy_willow_twigs_2

Happy decorating!
Happy Thanksgiving!

Share Button

DIY Double Dip Flip: Maple Seed Butterfly Art

Welcome to DIY Double Dip Flip! Heather and I are excited to share our fourth project in this series where we start with an inspiration piece from either fashion or decor, then we each show you our unique take on how to use the idea to create something entirely different in decor or fashion. For this month’s inspiration I chose a Butterfly Smoking Slipper by Jon Josef.
butterfly shoe_butterflies
………………………………………………………………………The Shoes

I first fell in love with these adorable smoking slippers because of the style and colors. Then the butterflies jumped out at me. I had been planning on making some art work using a bunch of helicopters (a.k.a. maple seeds) I had gathered and I knew a butterfly would be the perfect subject.

And now I give you my flip for this month:

maple_seed_butterfly_art_4

maple_seed_butterfly_art_7

maple_seed_butterfly_art_2

maple_seed_butterfly_art_3

I picked up an old window at the flea market for $10. I decided on a coral color scheme and created an ombre effect by mixing the paint myself.

maple_seed_butterfly_art_5

I love the way the helicopters look in their natural dried state, so I chose to leave them that way for the outer and inner borders of the butterfly.

maple_seed_butterfly_art_6

Now for the how to portion of the post. To create your own maple seed butterfly art you’ll need:

1) Maple Seeds (a.k.a. helicopters)
2) Old Window or Framed Glass
3) Craft Paints
4) Glue (I used E-6000)

maple_seed_butterfly_art_supplies_1
Spring and fall are the best times to gather maple seeds. After you collect them you’ll want to allow them to dry out. You can accelerate the drying process by laying them out in a single layer in a window sill. After a few days they will fade to the desired color.
maple_seed_butterfly_art_step_2

Decide on a color scheme and buy or mix your paint. If an ombre effect is desired you can start with the darkest paint as your base and then mix in white or cream to lighten the formula each time you paint a new layer.

maple_seed_butterfly_art_step_1
Draw or print out an outline of a butterfly sized to fit the frame you are using.

maple_seed_butterfly_art_step_3
Place the drawing beneath the glass, centered within your frame. Begin gluing the helicopters around the outer edge, following the general shape of the outline as shown.

maple_seed_butterfly_art_step_4
Once you have finished the outline you are ready to start on the second layer.

maple_seed_butterfly_art_step_5
Glue the second layer, overlapping the first layer and covering the seed pod.

maple_seed_butterfly_art_step_6
Continue gluing each consecutive layer in the same manner until your butterfly is complete.

maple_seed_butterfly_art_1

Thank you so much for stopping in. Heather has her own unique project to share with you using the same sweet slippers as her inspiration.

promo_DIY_Double_Dip_Flip_2
She always has something creative up her sleeve! Visit her at Woods of Bell Trees to check out her interpretation of this month’s flip!

signature

Linking with:Shabby Art Boutique, French Country Cottage, Funky Junk Interiors

Share Button

DIY Double Dip Flip: Chandelier Lamp Shades

Welcome to DIY Double Dip Flip! Heather and I are excited to share our third project in this series where we start with an inspiration piece from either fashion or decor, then we each show you our unique take on how to use the idea on something entirely different in decor or fashion. For this month’s inspiration, Heather chose an entire set with soft spring colors and lots of great texture.

soft_spring_palette
………………………………………………………………………A similar pullover C’est Si Bon

Being a lover of frayed edge denim, I was immediately drawn to the ripped knee patch jeans and decided to make that my jumping off point. I am in the middle of making changes in my breakfast nook and my chandelier needed a makeover.

So my flip for this month is DIY Chandelier Lamp Shades.

After my husband spray painted the fixture black I dressed the lamp shades in layers of frayed canvas.

chandelier_lamp_shade_tutorial_4
These were really easy to do and I’ll show you how with just a few steps. But first I want to show you the “before” picture of the chandelier.

chandelier_lamp_shade_tutorial_before
It’s not a very good picture but you can see that the fixture was an ivory color and the shades were black. You can also see the old wall color.

chandelier_lamp_shade_tutorial_1
The black fixture gives the space a more grounded feel. The frayed canvas cloth adds softness and texture. I love my new wall color and I can’t wait to show you the entire space when it’s complete. You can catch a glimpse of another finished piece for the nook here.

Now back to the lamp shade tutorial.

chandelier_lamp_shade_tutorial_supplies
Here’s what you’ll need to make your own tiered, frayed canvas lamp shades.

chandelier_lamp_shade_tutorial_supplies_2
A template for you to adapt for your own use. For standard chandelier type shades the width of the template needs to be 14 inches. I had to print it out on two sheets and tape them together.

chandelier_lamp_shade_tutorial_step_1
Cut out your 2 template parts and tape them together.

chandelier_lamp_shade_tutorial_step_2
Measure out and mark the pattern to be divided into 3 layers. The first mark for the bottom layer will be at 1 5/16 inches, the second mark at 2 5/8 inches.

chandelier_lamp_shade_tutorial_step_3
Make the same markings in a few more places across the pattern and pencil in the connecting curves.

chandelier_lamp_shade_tutorial_step_4
Cut out the three pieces. These will be the patterns for your three layers.

chandelier_lamp_shade_tutorial_step_5
Cut out your fabric, leaving an approx. 1/8 inch allowance above and below the pattern.

chandelier_lamp_shade_tutorial_step_6
Fray the fabric strips. Note: the bottom and middle layer will only need to be frayed at the bottom edge.

chandelier_lamp_shade_tutorial_step_7
The top layer will need to be frayed at both the top and bottom edges. You can fray the ends too.

chandelier_lamp_shade_tutorial_step_8
Glue the bottom strip to the lamp shade leaving enough fringe to cover the entire bottom rim.

chandelier_lamp_shade_tutorial_step_9
Overlap the middle layer and glue. Glue the top layer making sure to extend it far enough up to cover the top rim of the shade.

chandelier_lamp_shade_tutorial_3
This design could also be adapted for full size lamp shades.

promo_DIY_Double_Dip_Flip_2
So you’ve seen my take but you haven’t seen Heather’s! Be sure to go visit her blog Woods of Bell Trees to see how she interpreted this month’s design.

Thanks for stopping by!

signature

Linking with: Shabby Art Boutique, French Country Cottage

Share Button