I’ve had some requests to do a tutorial on my little bird featured in a Phrase Art Phriday post I did a few weeks ago. I’m so happy to share with you today my Dollar Store Bird Tutorial. I knew it would take a while to capture all of the instructions in photos but I really prefer to produce my tutorials that way for all the visual learners (like me). It would have been easier to just type a bunch of instructions and include a few photos, and for some that would have been sufficient to follow along. But when a project has more than 3 or 4 steps it can be difficult to follow without instructional photos. So, you’re welcome! :) But seriously, thank you for visiting and showing an interest in my projects.
I’ll begin by showing you my finished product, just completed for this tutorial.
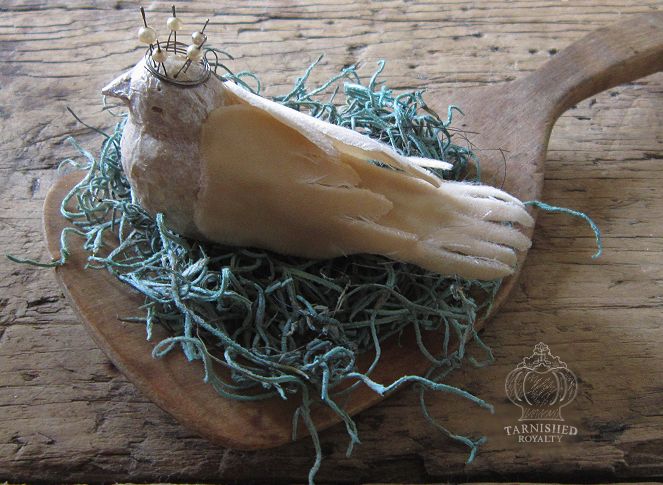
Each bird I have created has had its own personality.

The bird I used this time as a base was a tiny bit smaller than the one I used last time. You just never know what you’re going to find at the dollar store. I’ve had good luck finding them in the florals, usually attached to a branch of leaves or some evergreen. You can of course also get inexpensive bird bases at the craft store.


I decided to use pearls for this little birdie’s crown.

It suits her, don’t you think?
If you would like to create your own upcycled bird, here’s what you’ll need: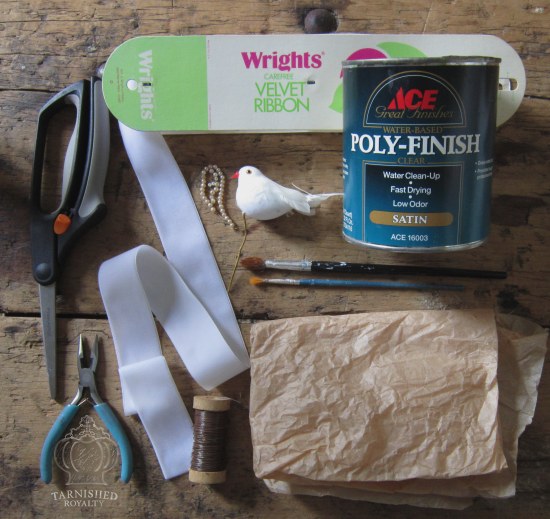
Supply specifics are given in the individual steps.

And this. I think I always forget to photograph at least one supply!
And now for the instructions:
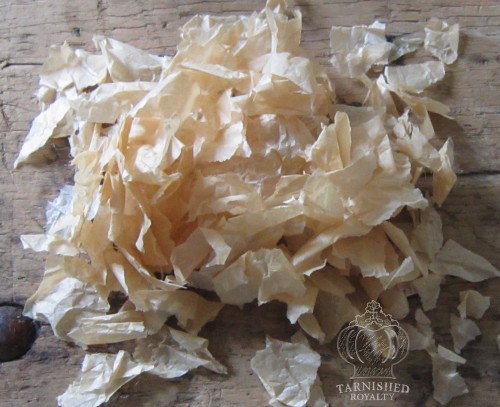
Step 1: Tear a piece of tissue paper into tiny pieces, approximately the size of your thumbnail and smaller. It won’t take an entire piece of tissue paper. Just start with a pile and tear more as you need it.

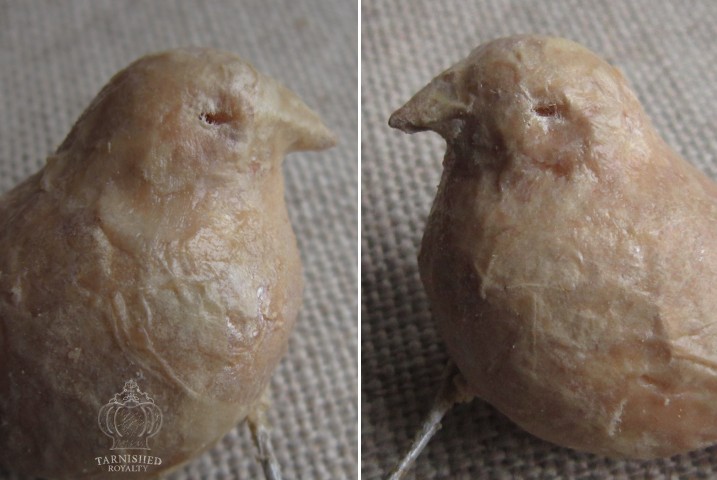
Step 2: Brush your chosen medium (water based sealer, Mod-Podge, etc.) on a small section of the bird, apply tissue pieces, and brush over them to flatten and secure.
Step 3: Continue applying tissue until the bird is completely covered, including the feathers, beak and eyes. Brush on a thin coat of metallic pearl white paint with a watery brush.

Step 4: Now it’s time to dig out the eyes (eewww). Using your fingernails or tweezers, poke through the tissue, grasping the eyes and wiggle them out. This will create a socket effect.
Step 5: Cover over the eye area with one layer of tissue paper. Then poke a tiny slit to create the eye, using a pin or needle.
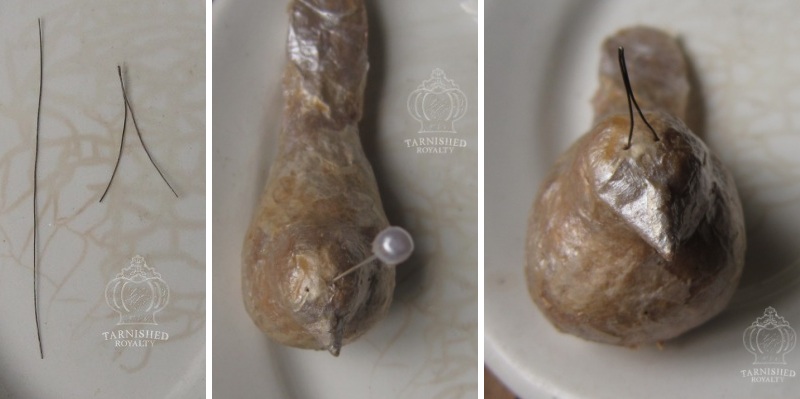
Step 6: Now for the crown. Cut 5 pieces of fine gauge wire 2 inches long each. Fold the wire in half, pinching together at the fold with pliers to form a point.
Step 7: Using a pin or needle, poke a pair of holes in the top of the bird’s head, approx. 1/8 inch apart. and 1/2 inch or so deep. Place the first crown spike in the holes and press in. You may have to reshape the spike a little after its in place. This is easy to do by pinching the top and running a toothpick or other slim item along the insides.

Step 8: Repeat step 7 until all 5 crown spikes are in place.

Step 9: To create the crown band, cut a piece of wire 6 inches in length. Wrap the wire around a tubular object (I used a permanent marker). Before placing the band on the bird’s head, push the 5 spikes toward the center to allow room for the band to fit over.

Step 10: Once the band is in place, spread the spikes back out again and place pearls or your chosen jewels onto the spikes, using a dot of glue to secure.
Next and lastly, we’ll give the bird her wings and tail feathers.


I included 3 pattern sizes to accommodate varying bird sizes. Just right click the images and save to your computer.

Step 11: Print and cut a wing and tail feathers from the pattern provided, using paper or card stock. You can use the same wing pattern twice instead of cutting it out twice.

Step 12: If you were only able to find white velvet, you can tea stain it. Just dip it in very hot tea, let sit for 5-10 minutes and blot with a paper towel to absorb most of the moisture and give it the desired depth of color. Allow it to air dry, right side up.
Step 13: Place wing and feather patterns on wrong side of velvet, attaching with a glue stick. Cut out the velvet, concentrating mainly on the outline of the pattern. The slits can be cut to desired length (I ended up cutting the slits in my velvet longer than the pattern slits.) If using one wing pattern twice, be sure to flip it over so it faces the other direction for the second wing.

Step 14: Before attaching the tail feather, trim the tissue on the bird’s tail as shown. Apply glue to the bird’s tail, spreading glue very, very thin over the surface (if glue is thick or too wet it will soak through to front of velvet.) Once the velvet is in place, you may have to cut slits in the base tail if it’s showing through the velvet tail slits.
 Step 15: Apply glue to the first wing, along part of the outer edge as shown. Please note: I feathered out the glue line more than is shown here before applying wing to bird. Attach the wing so that the inner top corner is up against the base of the bird’s head and the 5 feathers are angled as shown. Press gently into place along glued border and allow to dry.
Step 16: Repeat step 15 for second wing.
Note: After I made this bird I decided the tail feather was one feather too wide. So the pattern provided has been edited since then and for that reason you can see six feathers in my example instead of the five feathers in the pattern. Just in case anyone noticed!

If you like my aqua moss nest, see how to dye your own Spanish moss.
As always, I’m happy to answer any questions about materials, instructions, etc.

Linking with: Have a Daily Cup of Mrs. Olson,The Scoop, Mod Vintage Life, Between Naps on the Porch, From My Front Porch to Yours, Cozy Little House, A Stroll Thru Life, Ivy and Elephants, Style Elixir, Shabby Art Boutique, Reasons To Skip The Housework, Classy Clutter, French Country Cottage, Amaze Me Monday , VMG206, That DIY Party,The 36th Avenue,

Oh,my….you’ve done it again! What an awesome creation! Pinned it!
JP
Thank you JP! Your comment made me smile.
Ann, such an elegant bird. Love the clever way you used to make the eye and crown. Sharing and pinning. Definitely doing. Thanks for the great tutorial.
Oh good I’m glad you want to make one! I’d love to see it if you do! Thank you Donna!
Ann! This is brilliant and beautiful! I think I could make one with your tutorial. Pinning for sure.
Thank you, Tina, you’re so sweet. And thank you for pinning!
This is absolutely fabulous Ann! Love, love love this beautiful bird!
From one bird lover to another, thank you! chirp, chirp
Ann, you are so talented. This bird is absolutely gorgeous! Love everything about it! Thanks for sharing with SYC.
hugs,
Jann
Hi Jann! What would spring be like without birds?! Thanks a bunch!
this is JUST DARLING!!! I absolutely love it! What a GREAT idea!
Thank you so much Robin! Have a creative week! ~Ann
Wow, it looks great!
There’s so much potential in dollar store items, if you have imagination:)
I hope you’ll find the time to link up with us this week:
http://milaslittlethings.com/2015/04/idea-box-thursday-link-party-6.html
xx
Mila
Thank you Mila. You’re so right, the potential is all around!
Hi Ann, just hopping back to let you know that I will be featuring you at SYC this week.
hugs,
Jann
Ann, this is so absolutely precious and I’m inspired to make one! I love that you used a dollar store bird, I see them all the time but their colors are ugly. Your instructions are so easy to follow! Pinning and Sharing!
I agree, they leave a lot to be desired in their $1 state. Thank you so much for pinning and sharing!
Love this idea.. So sweet!
Thank you Lisa! So nice of you to stop by! ~Ann