I just added a few pieces of jewelry to my shop and I wanted to give you a preview here. I have been embracing the colors of coral and turquoise a lot lately.
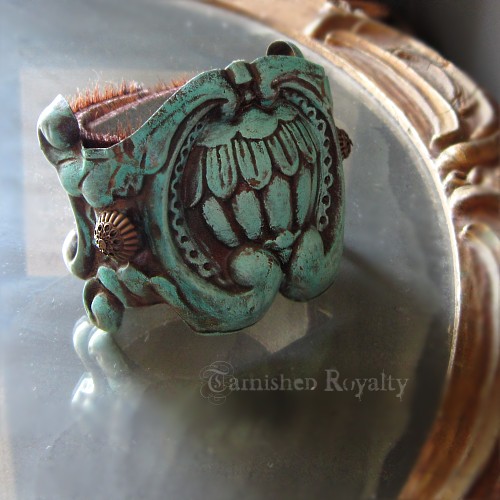
Here’s a cuff bracelet with a vintage metal hardware piece as the centerpiece. I added turquoise patina to bring out the amazing detail.
I was getting a sort of western vibe so I chose cowhide leather with brindle hair for the band.
As you probably know, I am very committed to reusing and reinventing pieces and parts, mostly vintage, to create new pieces that work in today’s design. Virtually all of my jewelry incorporates upcycled items, most of which had nothing to do with jewelry in their original state.
For this necklace I took belt loops from an old pair of blue jeans, overlaid them with vintage lace and formed them into a cross.
A vintage button and swirly coral glass beads add a pop of color.
I do love crosses!
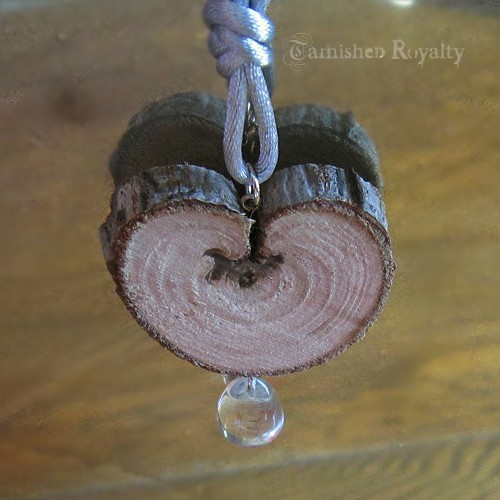
Another material I love to use when designing is items found in nature. We have a lot of trees in our yard and have done a few projects using the wood from them. It’s not often you come across a branch that yields heart-shaped slices, so of course I was elated to find and use this one in my jewelry designs.
Mixing rustic with a bit of bling, I paired it with a glass crystal drop (also vintage)for a simple, natural necklace.
I’ll show you a more colorful version of the heart slice in my next studio share.
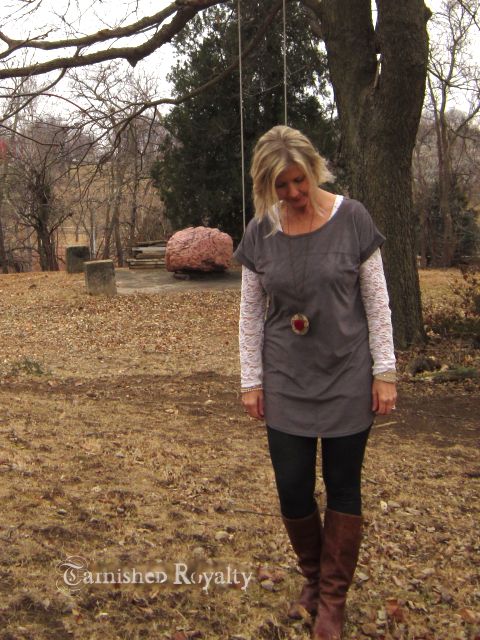
I love a good tunic. Tunics cover your bum when you are feeling modest.
A tunic is not quite a dress but a little more than just a top. They go perfectly with leggings which go perfectly with a no-jeans kind of day.
And tunics are great for showing off a long necklace.
I layered a lace top underneath the gray tunic to tie in with the lace of the necklace. My long necklace is one I created using a rusty piece of hardware as the base, covered in vintage lace and adorned with a chunky red vintage button. The small pop of red was enough color to keep my outfit from feeling drab and dreary like the winter days we’ve been having.
Wearing a tunic and leggings is much like wearing a dress and tights. Often times I feel like an occasion doesn’t quite call for a dress. When I want to wear something just a little more casual I pull out my tunic. Now that I have sung the praises of tunics, I think I need to get a couple more!
Here I am wearing the same outfit in our newly renovated wine cellar where we hosted our couples Christmas party this past December.
And here are the guys at the same party, showing off their looks.
As the countdown continues, I am wrapping up all the earring designs I will have with me to sell at Junk Jubilee Jingles. The event will be held at the state fairgrounds in Des Moines, Iowa Friday, Saturday, and Sunday, November 14, 15 and 16, 2014. Last week I showed you some bracelets, just a small sampling of the over 100 bracelet designs I will have for sale.
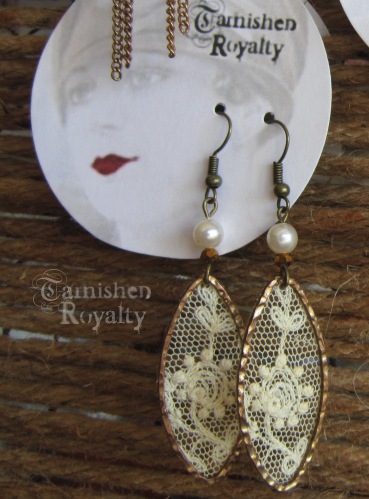
This week’s preview features earrings.
These designs are all brand new and will be making their debut at the show, along with close to 100 other earring designs.
For this patriotic pair, I cut out and embellished vintage military stars.
I love to come up with new ways to use old lace.
I’ve made several of these hand cut leather crosses, in lots of colors and styles.
I have close to 100 pairs of earrings that I will be bringing to sell, each with its own one-of-a-kind design. If you live anywhere near Des Moines, I hope you make plans to attend the show. It’s worth a few hours drive for sure, and you can get a bunch of Christmas shopping done early!
Next up: Brand new necklace designs. Thanks for dropping by!
Gosh, it’s been a while since I’ve posted much or visited my favorite blogs. It’s been a little chaotic over here, with just life. Hopefully things are settling down a little now and I’ll be around more. I’ve missed you! I would love to show you some of the things I found on a recent flea market excursion.
I am crazy for old velvet, so when I saw these very old frames on the $1 table at the flea market it was love. You can tell how worn and faded they are, that’s why I love ‘em.
Rarely do I hit the market without picking up some sort of lace. Isn’t this basket sweet?
And no junking day would be complete without a stash of junk jewelry.
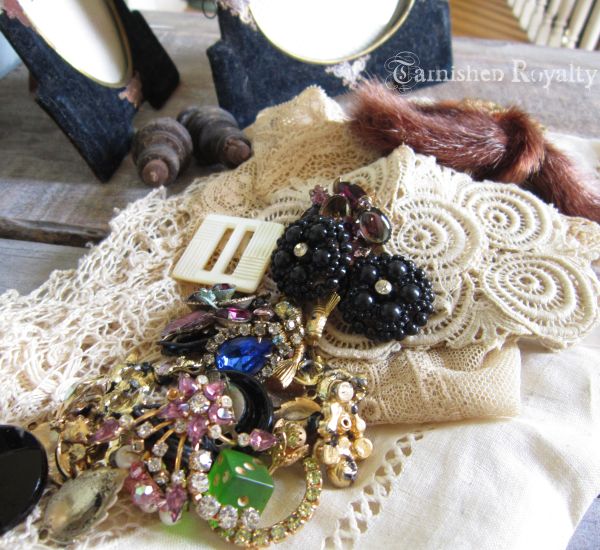
I am so excited to be gearing up for a great and big show in Des Moines this November. Junk Jubilee Jingles will be held November 14, 15 and 16 at the Iowa State Fair Grounds. Have you heard of it? It’s worth the trip, with quality vendors of all sorts, great shopping for yourself or holiday gift buying and fantastic displays to inspire. Some of the jewels, buttons, buckles and bow in the above pic will make their appearance at the show once they are fashioned into wearable art. I’ll be talking a lot about the show between now and then. If you live anywhere near I hope you make plans to come and shop!
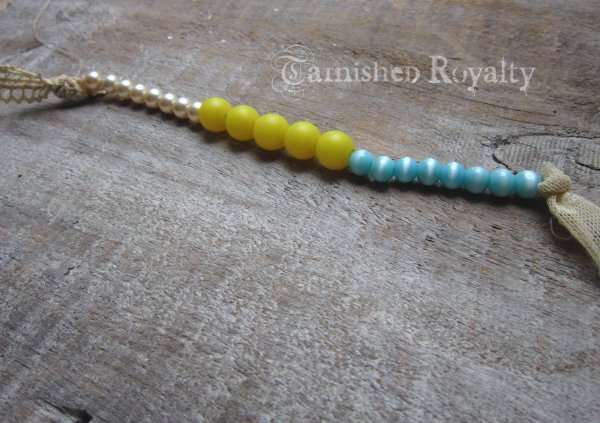
Welcome to Girls Want Pearls #51, where every Monday for 52 weeks we take a look at pearls, their role in history and fashion and how we can repurpose them in our wardrobe and home. Only 1 more week left in the series after today! But I have many more fun things in store for the creative soul on my blog in the next year. Today we’ll be making an eyeglass lanyard for your reading glasses or sunglasses.
I don’t know about you, but I like to have my reading glasses and my sunglasses right at my fingertips. I’ve been wanting something to wear around my neck to keep them handy for some time, and finally decided to make myself an eyeglass lanyard. It’s a quick project, and no jewelry making skills required!
Here’s what you’ll need:
Start by threading a needle with approx. 12 inches of doubled thread or beading wire, knotted on the end.
Cut 3 pieces of lace into the following lengths: 3 inches; 3 inches; 12 inches. The width can be whatever you want it to be ~ mine are approx. 1/2 inch wide.
Tie a knot in one end of each small piece of lace, and in both ends of the large piece of lace.
Take the needle and thread and stitch through the knot in one of the small pieces, making 3 or 4 stitches, then begin adding beads.
The first section, from start of lace to end of beads should be approx. 11 inches.
Now it’s time to connect the completed section to the large piece of lace.
Stitch through the knot in one end of the large piece of lace, making a few stitches and tying off the thread.
Rethread the needle with another 12 inches doubled and knotted on the end.
Stitch through the knot on the other end of the large piece of lace, making 3 or 4 stitches, then add beads and the final small piece of lace to create another 11 inch section.
You’re almost done now, there’s just one more step.
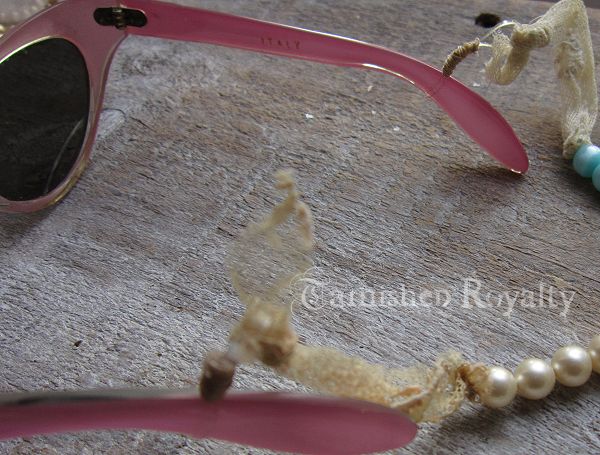
The final step is to add the piece that will hold your glasses. You have a choice to make here. You can either add a ring, and hang your glasses on like this…
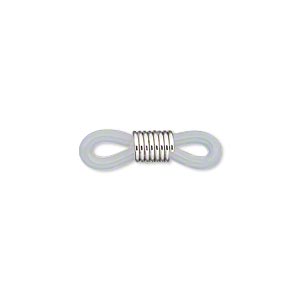
Or you can add looped eyeglass findings like these… …………………………….source
Or if you’re cheap like me, you can create your own hack by wrapping and stitching thread around a clear hair band. I like the loop style better for days where I’ll be taking my glasses on and off frequently (like when shopping), since they allow for a one-handed method. Either way, you’ll never have to dig in your purse for your glasses, or wonder where you put them.
Next week’s pearl post hint: Calvary
Love pearls and don’t want to miss any pearly posts?
You can get a reminder, just fill in your info below and I’ll email you when a post goes live and send you a monthly newsletter.
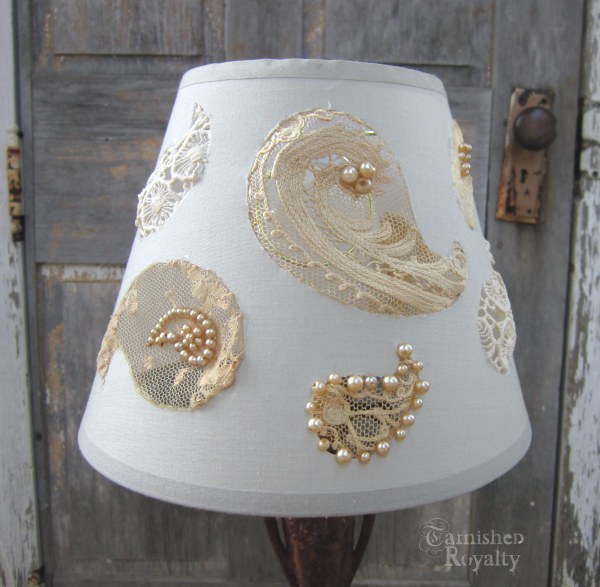
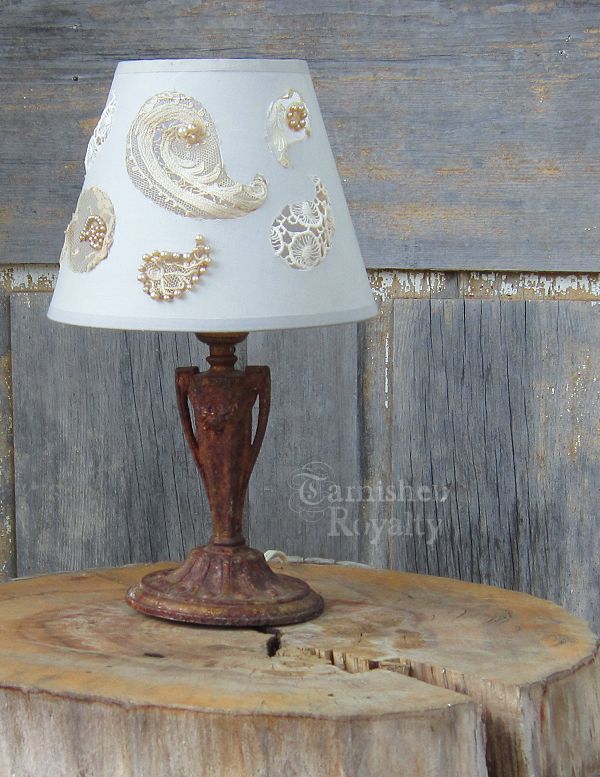
Happy Summer Monday! Thanks for stopping by for another Girls Want Pearls! I can’t believe this is #50 in my series about pearls and that there are only 2 more left after today! I’m excited about today’s project so let’s get to it! What could be prettier than a Paisley Lace and Pearl Lampshade?
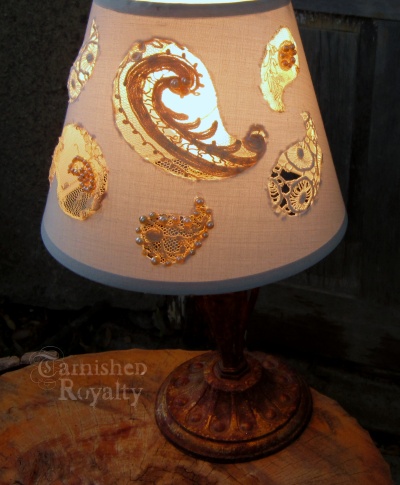
Isn’t it fun? I love it on my funny little crooked vintage lamp. I’m pretty sure it’s my favorite pearl project to date. Of course it’s not the first time I’ve thought this. When I made the pearl spider and web back in September it was my favorite.
Then in February when we were all so over winter, these ombre vases were my favorite.
And in March I made a pearl nest which took over the #1 spot in my heart for pearl projects.
The lampshade requires a bit more time than some of the simpler projects but it’s definitely do-able in a day, and definitely worth it.
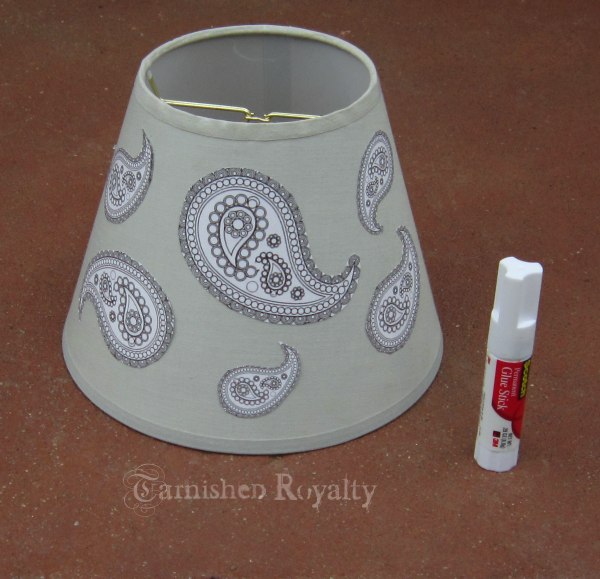
Ready to make your own Paisley Lace and Pearl Lampshade? Here’s what you’ll need: And a printout of this or your own paisley pattern: Print the paisley design in a few different sizes (feel free to leave me a comment if you need help with this step). Cut out the “paisleys.” Stick them on the lampshade with a glue stick or other glue. Using a sharp knife, score around the pattern. Remove the pattern and cut the design into the lampshade. It’s okay if the edges are not smooth ~ the lace will fill in and cover the edges. Cutting tip: It seems to work best if you get the knife in about halfway and keep it there will slowly gliding it around the scored area. Use the cutouts or the paper pattern to cut your lace. Cut the lace, adding an approx. 1/8 inch border all the way around. Glue the lace to the inside of the shade, making sure to leave some slack in the lace, with the edges of the lace pushed as close to the edge of the cutout as possible so it won’t be visible when the lamp is turned on. Next, move to the outside of the shade and push the excess lace in against the cutout edge, covering the jagged edges. Glue pearls on in a few areas, outlining the paisley or dotting the lace with curly cues, mini paisley shapes or circles. Let’s light the darkness around us! As always, leave any questions in the comments. Do you have a favorite pearl project from my series? I’d love to hear!
Next week’s pearl post hint: Eye See You
Love pearls and don’t want to miss any pearly posts?
You can get a reminder, just fill in your info below and I’ll email you when a post goes live and send you a monthly newsletter.